
Access Control
The SmarTruck system offers the ability to manage employee permissions through truck and operator groups in the “Access Control” menu.
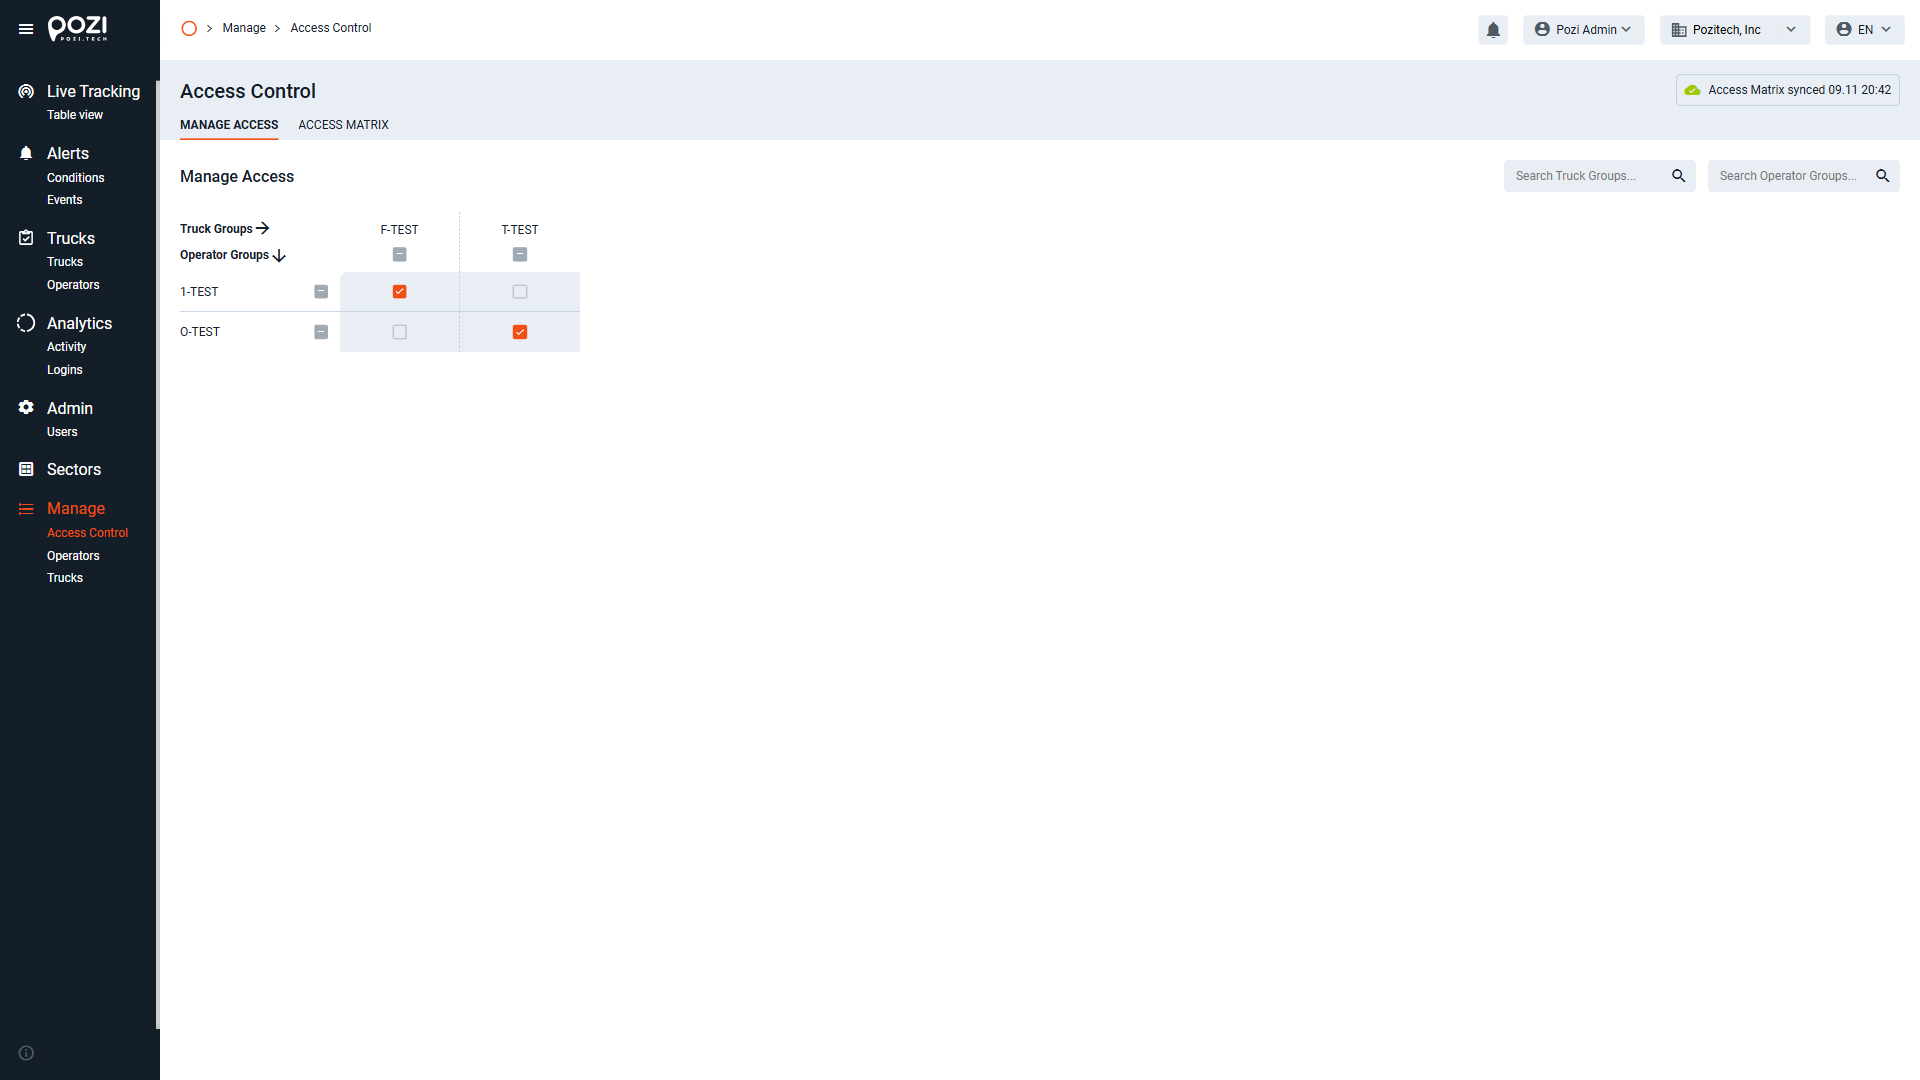
In the “Manage Access” section, you can create associations between operator and truck groups. If you have previously created these groups, they will appear on this screen. Operator groups are displayed vertically, while truck groups are arranged horizontally.
To assign permissions, tick the checkbox at the intersection of a specific operator group and a truck group. This action links the two groups, allowing members of the selected operator group to use the trucks in the corresponding truck group.
To remove a permission, simply uncheck the relevant checkbox, thereby breaking the link. An operator or a truck can belong to multiple groups, meaning a person or vehicle may simultaneously be part of several groups.
Access Cards – Master Card
In the SmarTruck system, truck operation requires authorization. This is managed at the hardware level using RFID-enabled identification cards. Each truck operator must have a unique access card with an individual identification number. The system includes “master cards,” which allow unrestricted truck use.
Master card identifiers are stored in the firmware of custom-developed hardware units installed on the trucks. Under normal conditions, these identifiers cannot be deleted or modified, except through a firmware update.
Access Cards – Supervisor Card:
In the SmarTruck system, truck operation requires authorization. This is managed at the hardware level using RFID-enabled identification cards. Each truck operator must have a unique access card with an individual identification number. The system includes “supervisor cards,” which allow unrestricted truck use.
Supervisor card identifiers are NOT stored in the firmware of custom-developed hardware units installed on the trucks but handled in the server. These identifiers can be deleted or modified.
Access Cards – Operator Card:
In the SmarTruck system, truck operation requires authorization. This is managed at the hardware level using RFID-enabled identification cards. Each truck operator must have a unique access card with an individual identification number. The system also includes “operator cards,” which allow restricted truck use.
Operator card identifiers are assigned on the web interface, see Manage menu point. These identifiers can be deleted or modified any time.
Permissions
Authorization management in the SmarTruck system operates on three virtual levels. Understanding the function and interconnection of these levels is essential for proper use. Permissions are assigned to trucks through the following process:
1. Client (Web Interface)
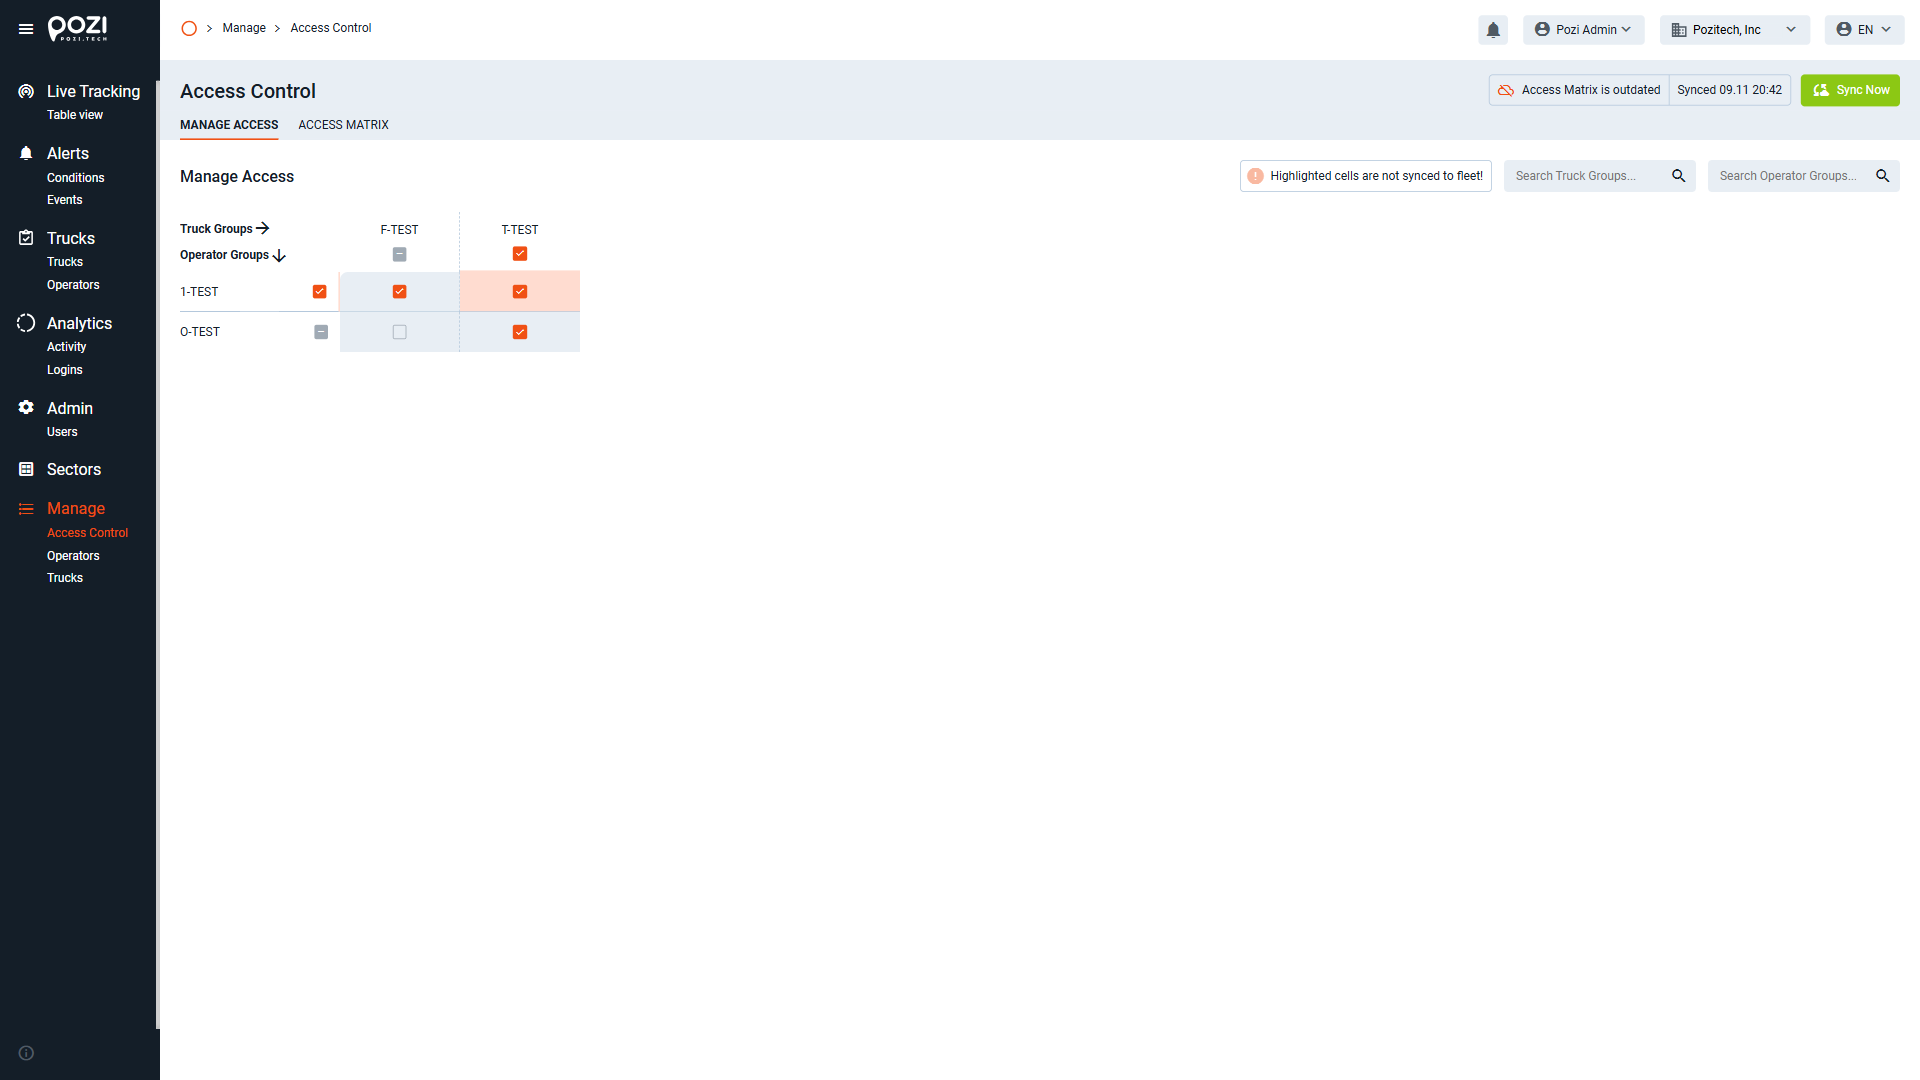
On the web interface, permissions are configured via the Manage / Access Control menu, using a connection matrix to link trucks with operator groups. These settings are uploaded to the server (Level 2) when you click the green “Sync Now” button.
2. Server
Once the Sync Now button is pressed, the permission matrix from the client is uploaded to the server. The “Synced” notification indicates that the client and server are synchronized. After this, the server begins syncing the trucks.
3. Trucks
The SmarTruck system updates trucks based on the current permission matrix stored on the server. This process can take time and depends on whether:
- The trucks are in areas with internet access.
- The trucks are powered on.
Synchronization
For seamless operation of the SmarTruck system’s access control module, the following conditions must be met:
- Operators must have assigned access cards.
- Truck and operator groups must be created.
- Trucks and operators must be assigned to their respective groups.
- Connections between truck and operator groups must be configured.
Operators
With the correct user rights, you can use the “Manage” menu on the SmarTruck Web Interface to handle operators.
Essential Fields
Location: The “location” field is of critical importance, serving as a key for linking operators and locations, as well as groups and locations. You can enter this information in text form, and new locations can be created when adding a new operator. To enter a location, type the location name into the field and click on the “use (LocationName)” option that appears below. Make sure to finalize changes by clicking the “save changes” icon.
Access Cards: Similar to the “location” field, new cards can also be created during operator creation. Note that the card number field only accepts numeric values. To add a new card, enter the card number in the field and click on the “add (card number)” option that appears below. Finalize changes by clicking the “save changes” icon. To remove an assigned card, click the “-” symbol next to the card number in the details menu, then click the “save changes” icon.
Groups: In the SmarTruck system, the group is a key element of permission management. Permissions are assigned to groups rather than individual entities, making it essential to assign all operators and trucks to a group.
Groups can be created under the “operator groups” or “truck groups” menus. The groups created here can be selected when adding or modifying individual operators and trucks.
Viewing Operators
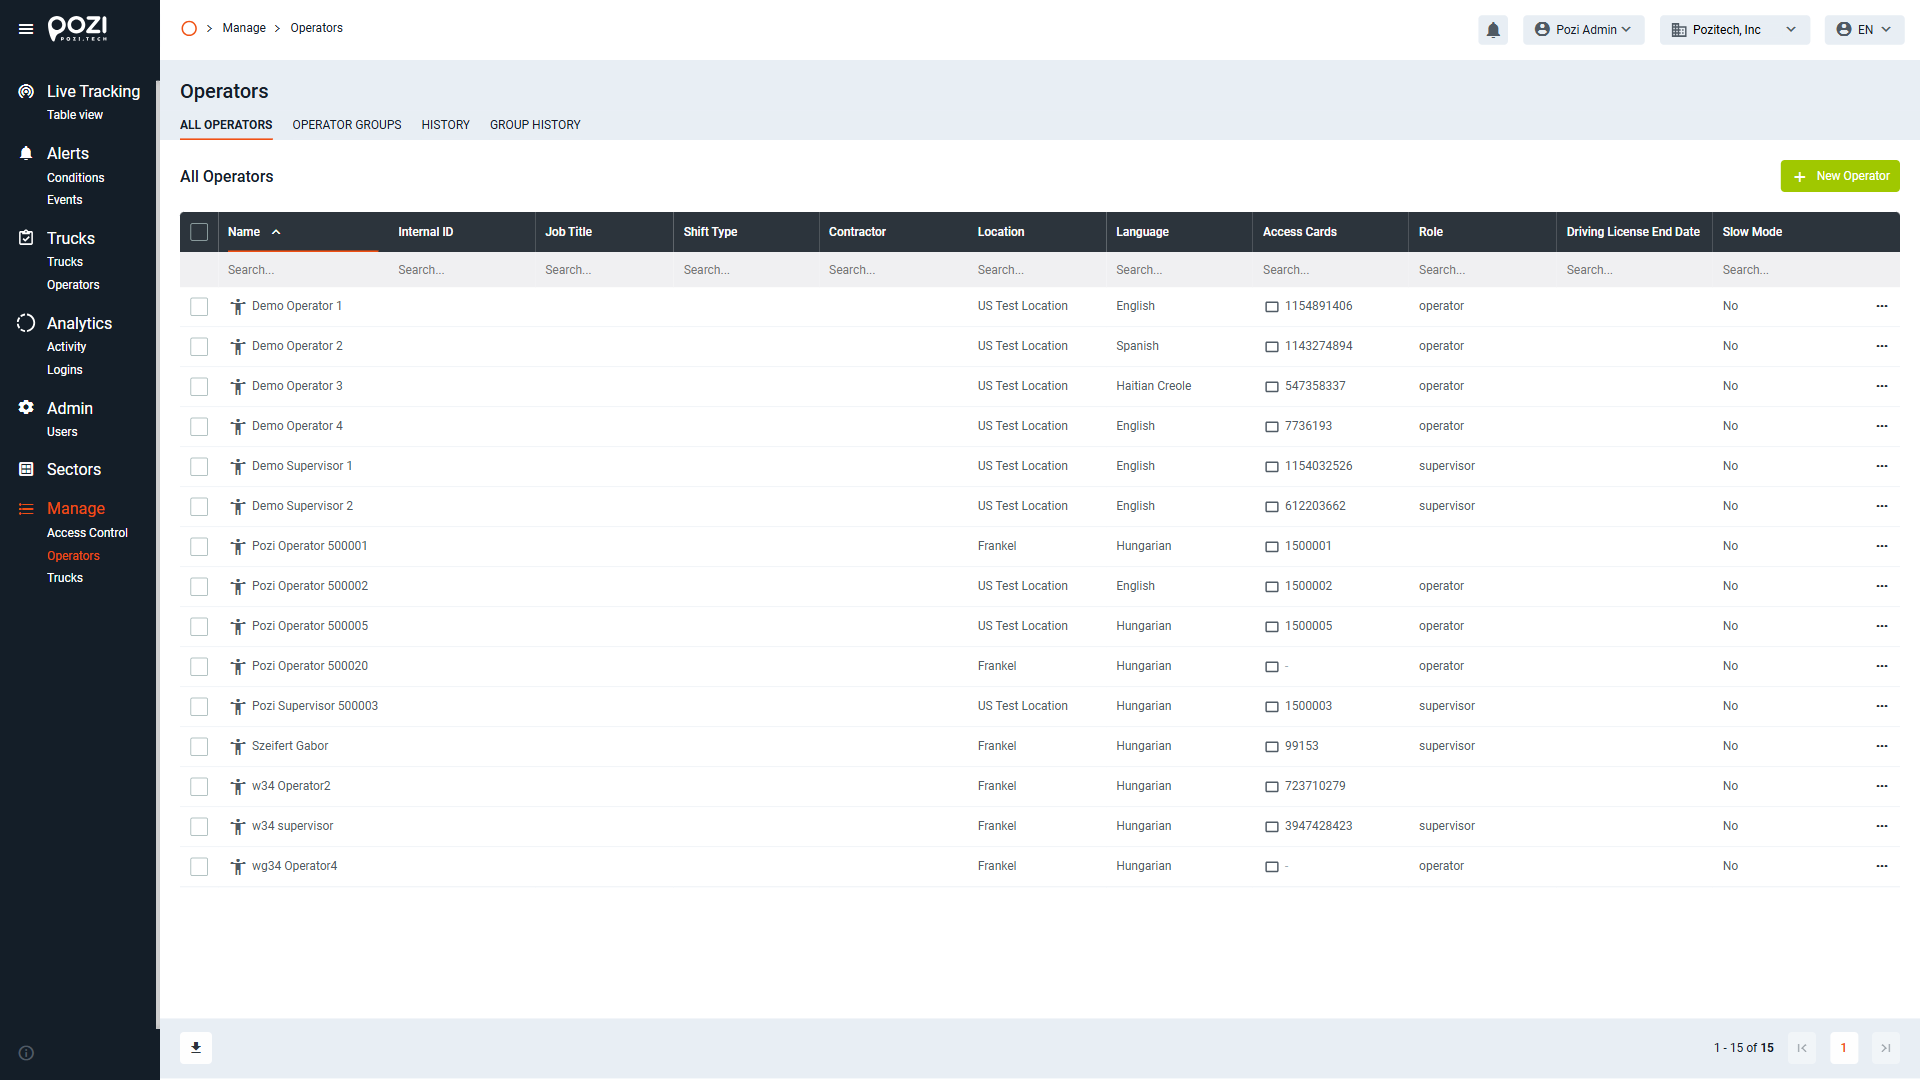
- Select the “Operators” menu item to access the overview page, where a list of recorded operators appears.
Editing an Operator
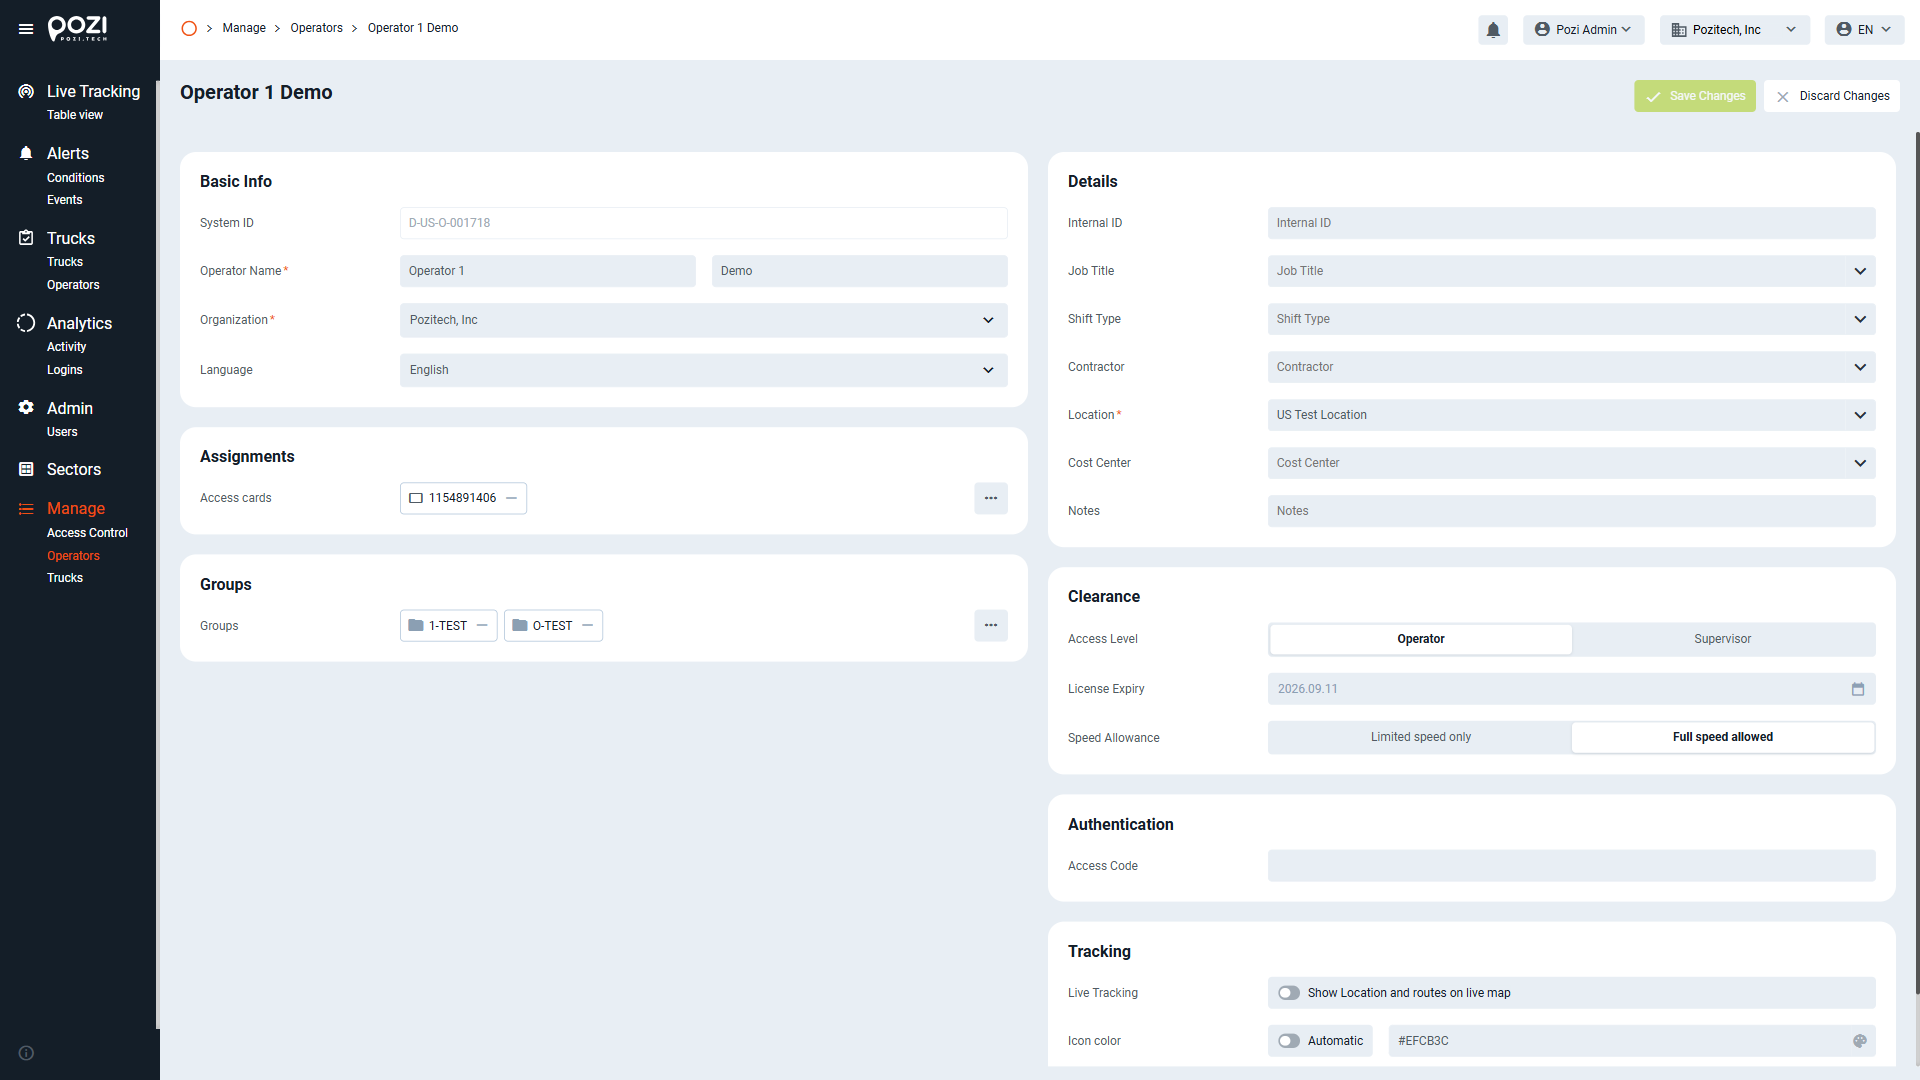
- Click on an operator’s name to open their detailed profile, where you can edit various parameters.
- To modify a specific field (e.g., name), click on it, make your changes, and then click the “Save Changes” icon in the upper-right corner.
- Some fields offer a drop-down menu for selection. Choose your desired option, then save your changes.
- If you’d like to add a new operator then click on “New Operator” in the upper-right corner to open the input form.
- Fill in the necessary information and click “Add Operator” to save. If you wish to cancel, click “Cancel” to return to the overview page.
Groups
For effective permission management, each operator must belong to at least one group (but can belong to multiple groups).
Operator groups can be created and managed in the Manage > Operators > Operator Groups menu.
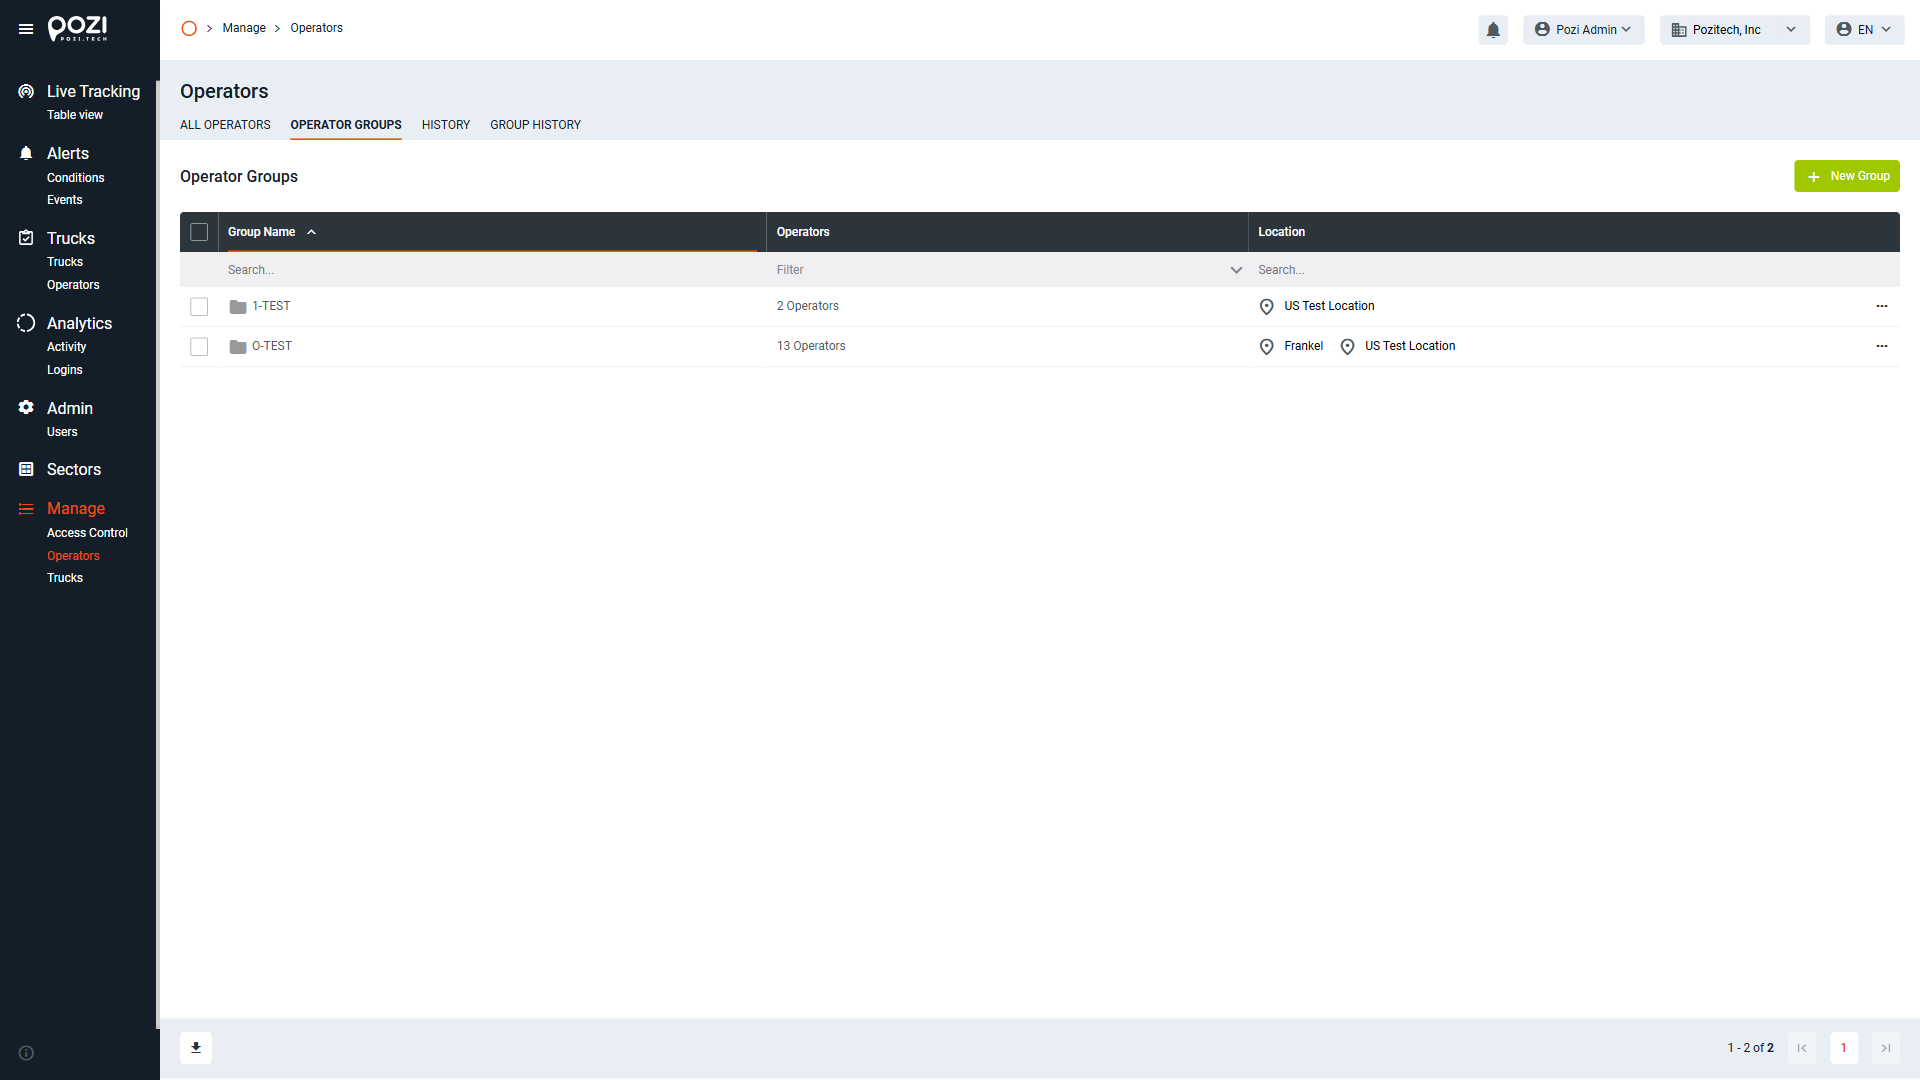
To create a group, click the green “New Group” button on the Operator Groups screen. In the pop-up menu:
- Name the group.
- Assign it to one or more locations.
- Click the “Add Group” icon to finalize the creation.
Viewing History
By clicking on the “history” menu item, we can open the list of editing history related to the currently examined entity type or group. In this list, each addition, deletion, edit can be found with a time stamp and the user who made the changes.
You can search for dates, names, event types, etc. – or you can filter the list according to your own preferences.
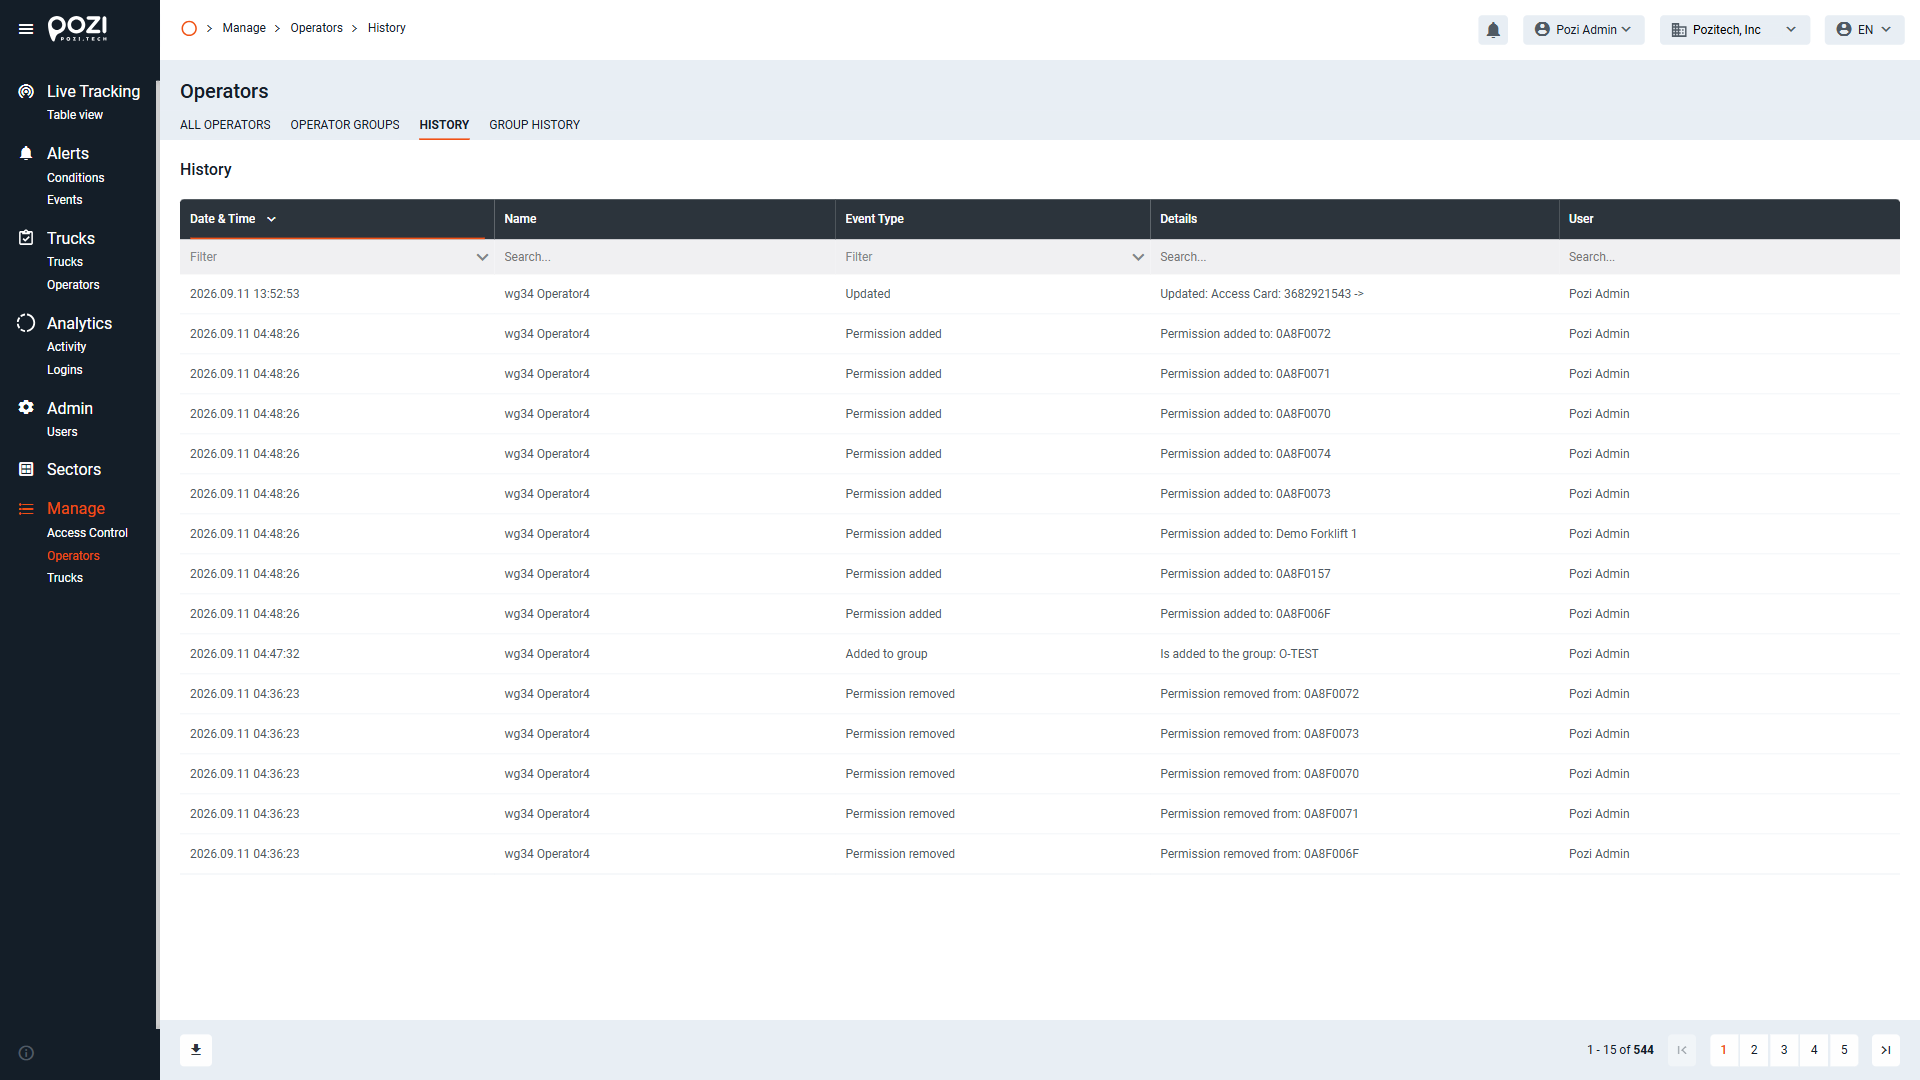
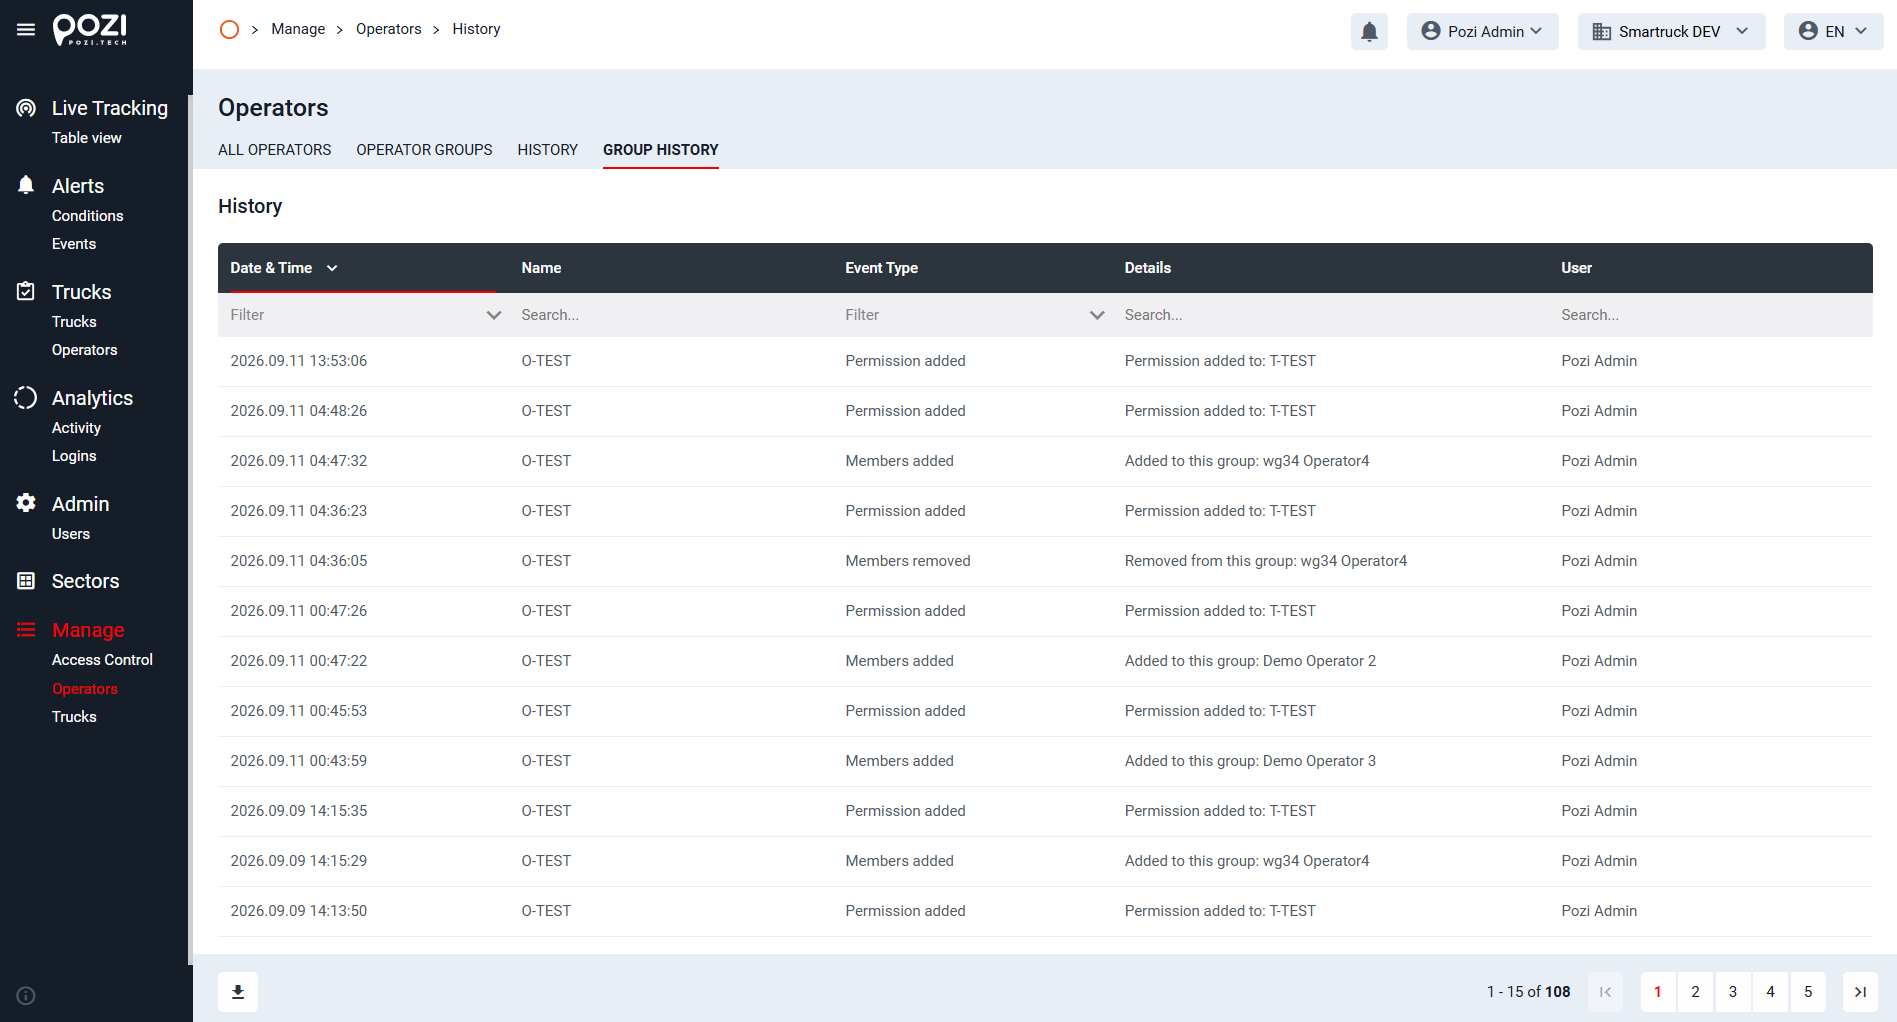
Using these steps, you can effectively manage operators within the SmarTruck system.
Trucks
With the correct user rights, you can use the “Manage” menu on the SmarTruck Web Interface to handle trucks (referred to as “trucks”).
Essential Fields
Location: The “location” field is of critical importance, serving as a key for linking operators and locations, as well as groups and locations. You can enter this information in text form, and new locations can be created when adding a new operator. To enter a location, type the location name into the field and click on the “use (LocationName)” option that appears below. Make sure to finalize changes by clicking the “save changes” icon.
Groups: In the SmarTruck system, the group is a key element of permission management. Permissions are assigned to groups rather than individual entities, making it essential to assign all operators and trucks to a group.
Groups can be created under the “operator groups” or “truck groups” menus. The groups created here can be selected when adding or modifying individual operators and trucks.
Viewing Trucks
- Select the “Trucks” menu item to see an overview page listing all trucks in the system.
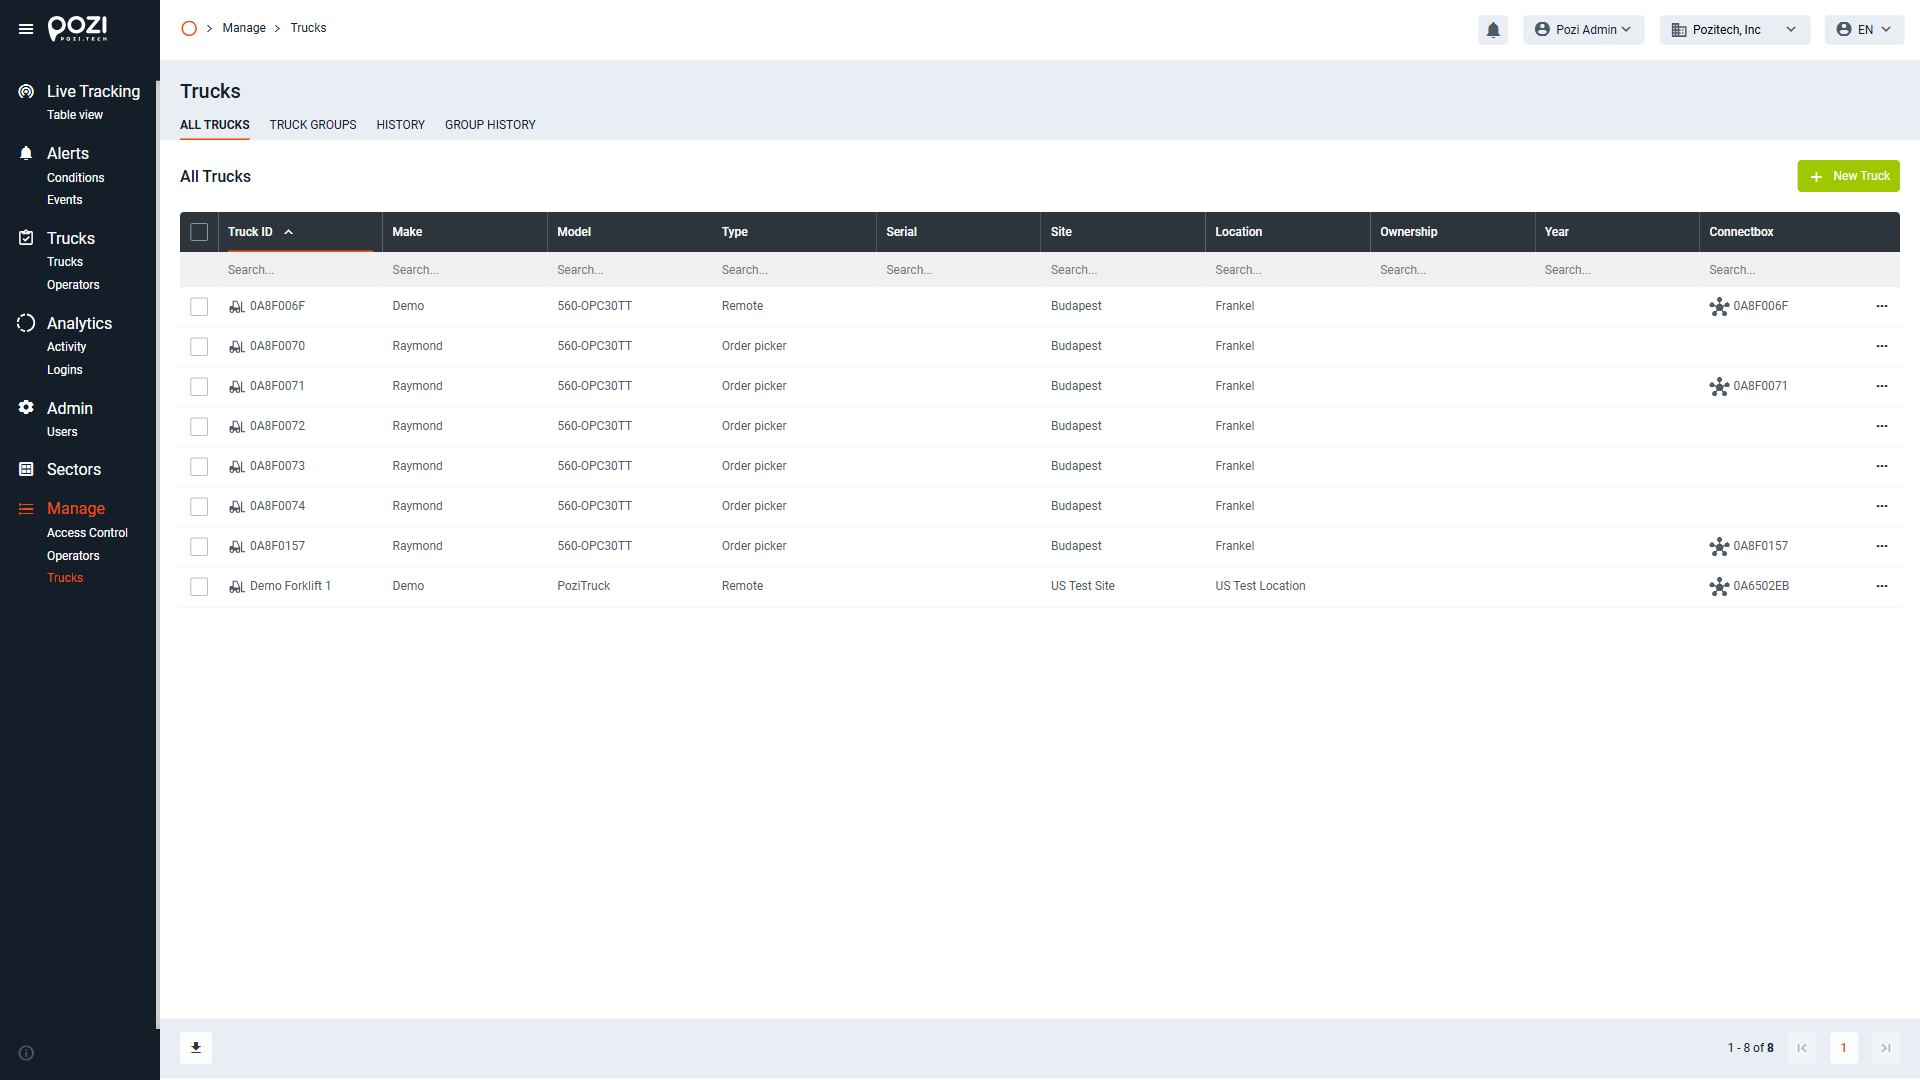
Editing a Truck (add or modify)
- Click on the truck name (or on the 3 dots at the end of the line and select edit) you wish to update to access its detailed view.
- To change a parameter (e.g., name), click the respective field, edit as desired, and select “Save Changes” in the upper-right corner
- For drop-down fields, choose the preferred option and save your changes.
- If you’d like to add a new truck, then click on “New Truck” in the upper-right corner to open the new entry form.
- Enter the truck details, then click “Add Truck” to save or “Cancel” to return to the overview page.
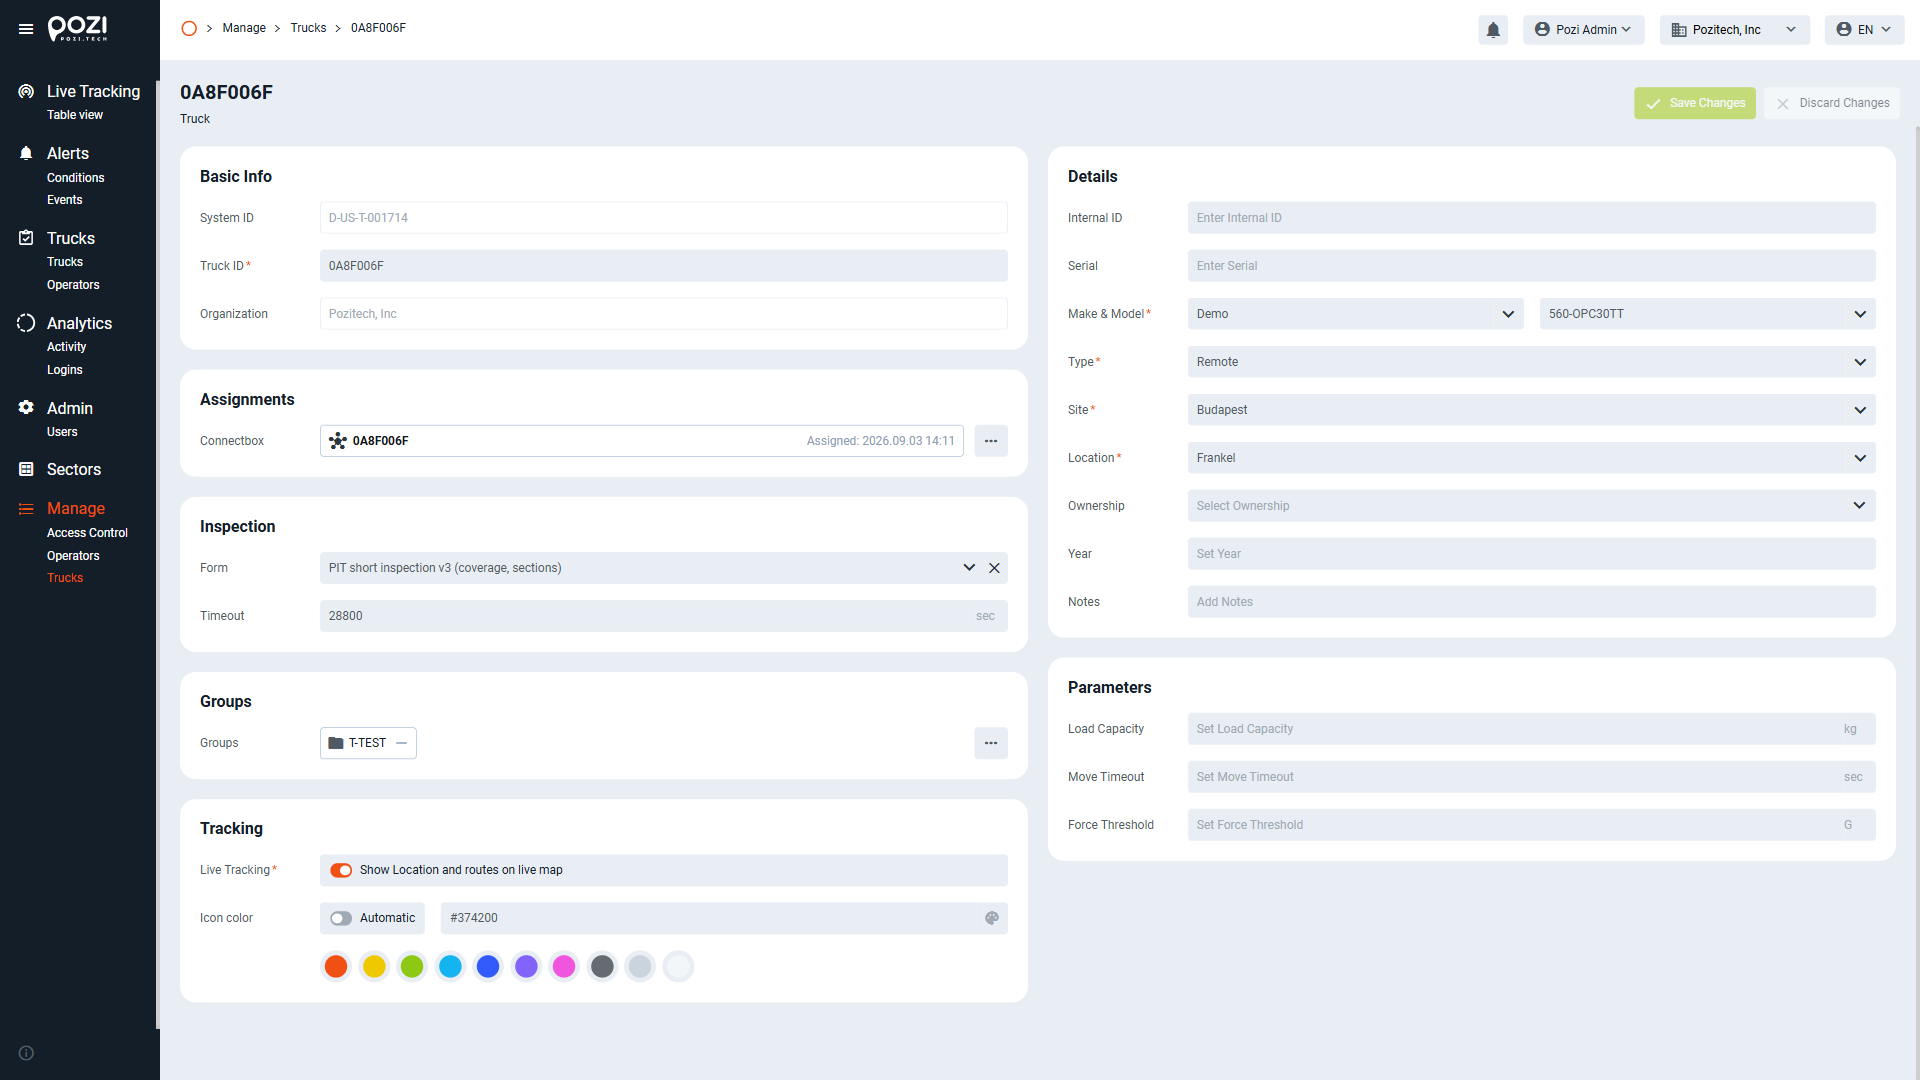
Groups
For effective permission management, each truck must belong to at least one group (but can belong to multiple groups).
Truck groups can be created and managed in the Manage > Trucks > Truck Groups menu.
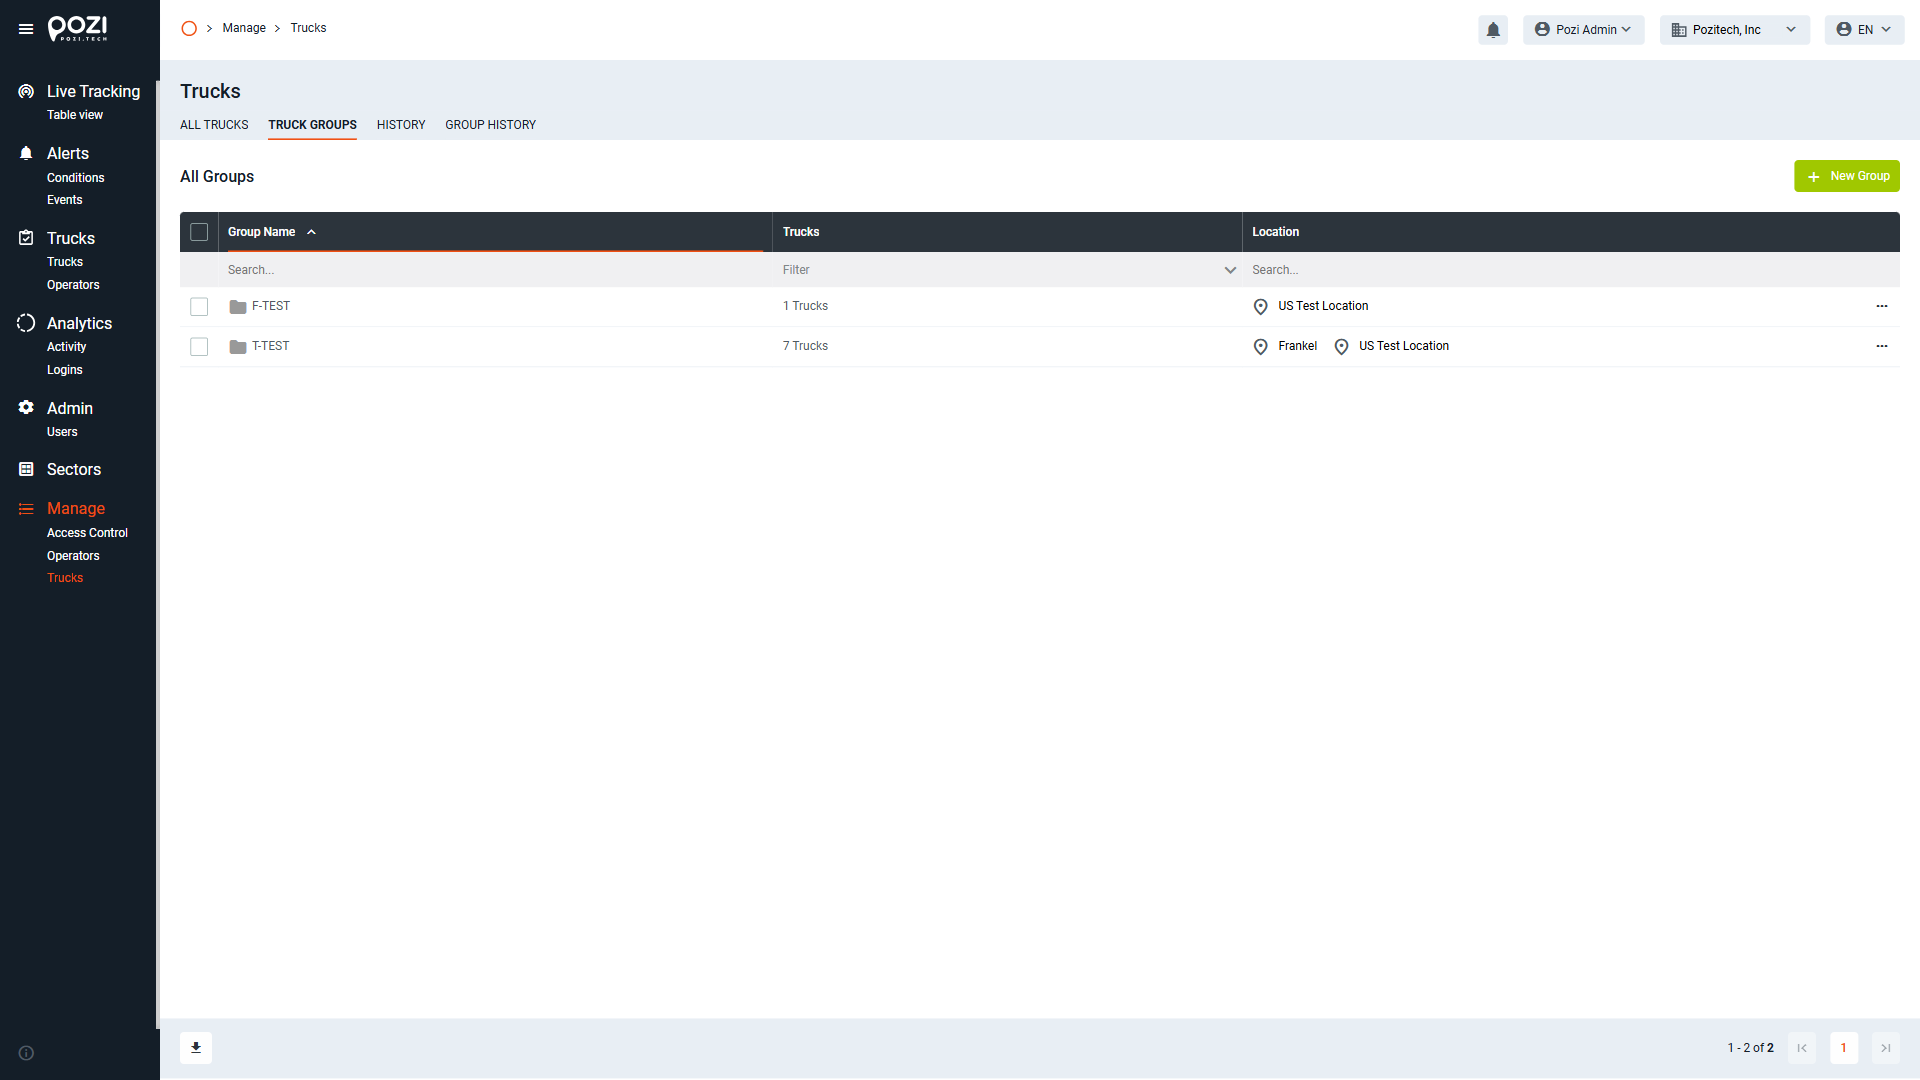
To create a group, click the green “New Group” button on the Truck Groups screen. In the pop-up menu:
- Name the group.
- Assign it to one or more locations.
- Click the “Add Group” icon to finalize the creation.
Viewing History
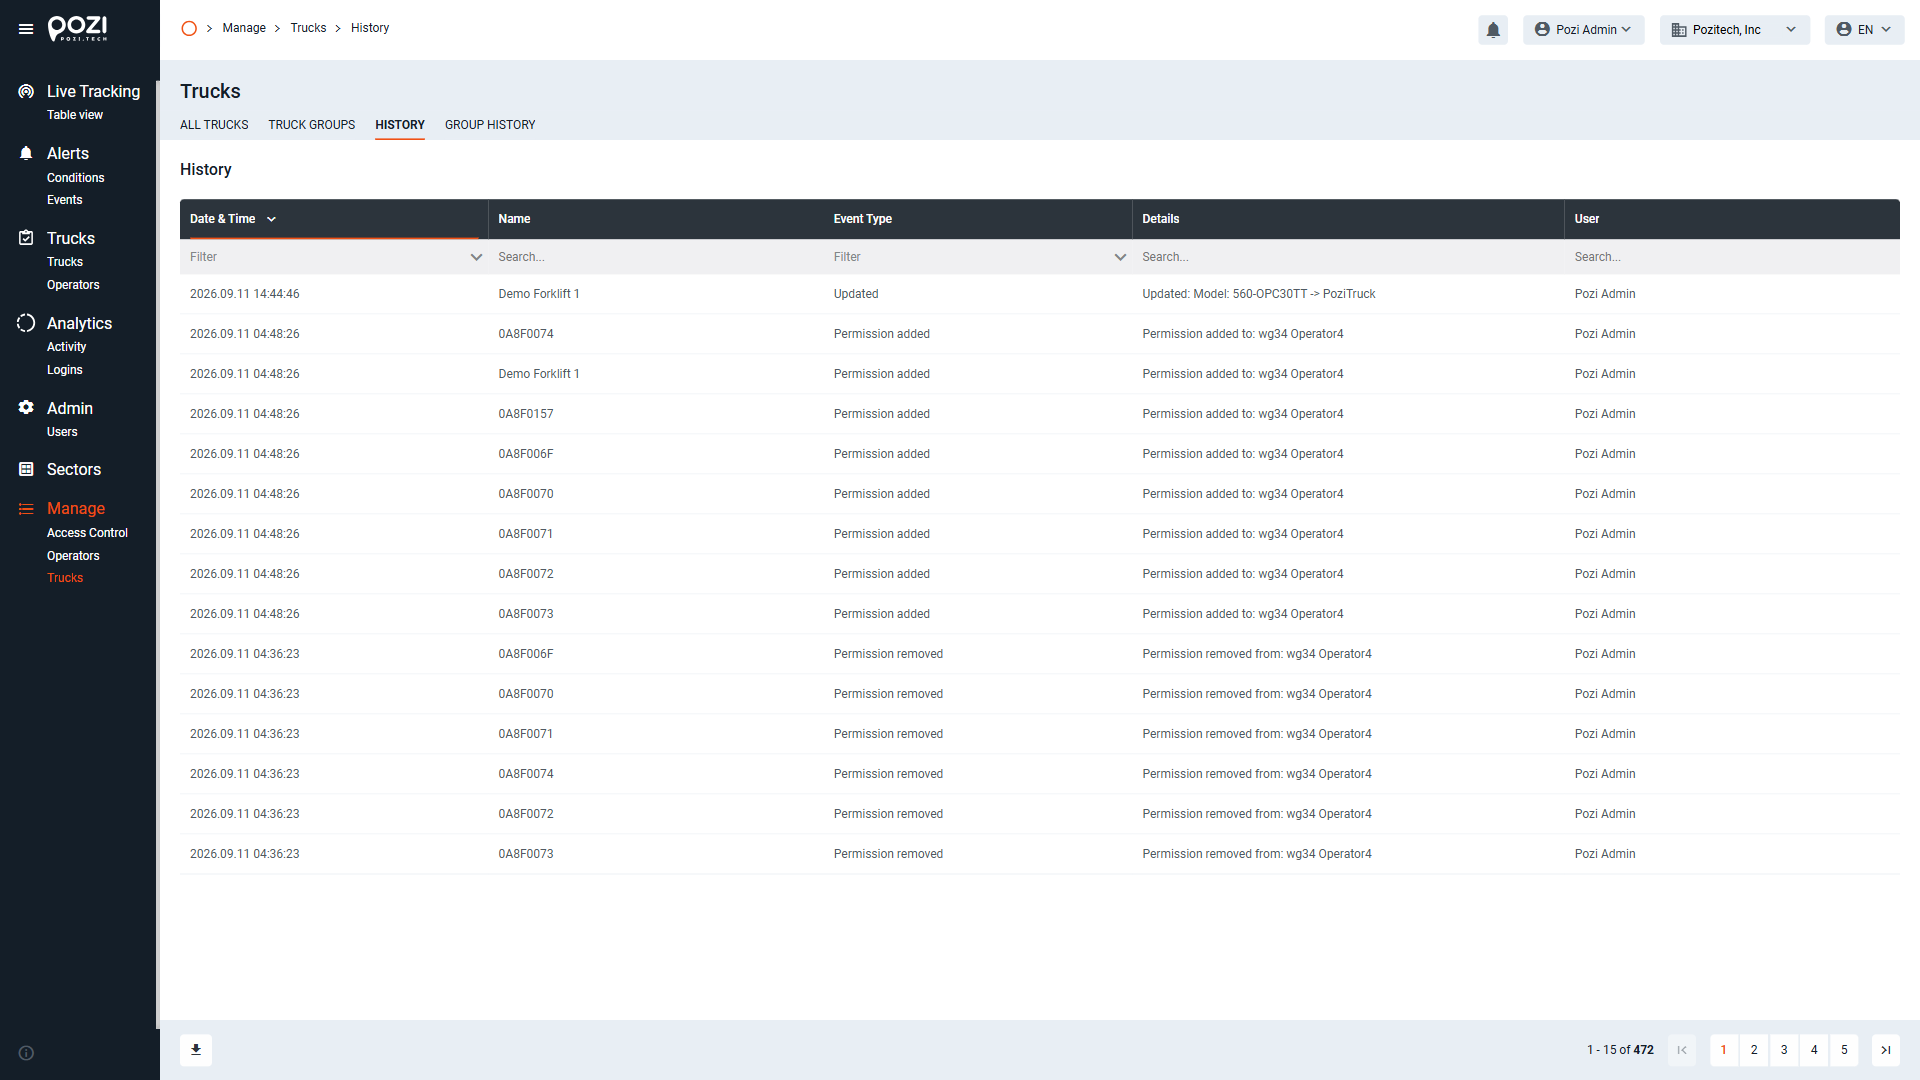
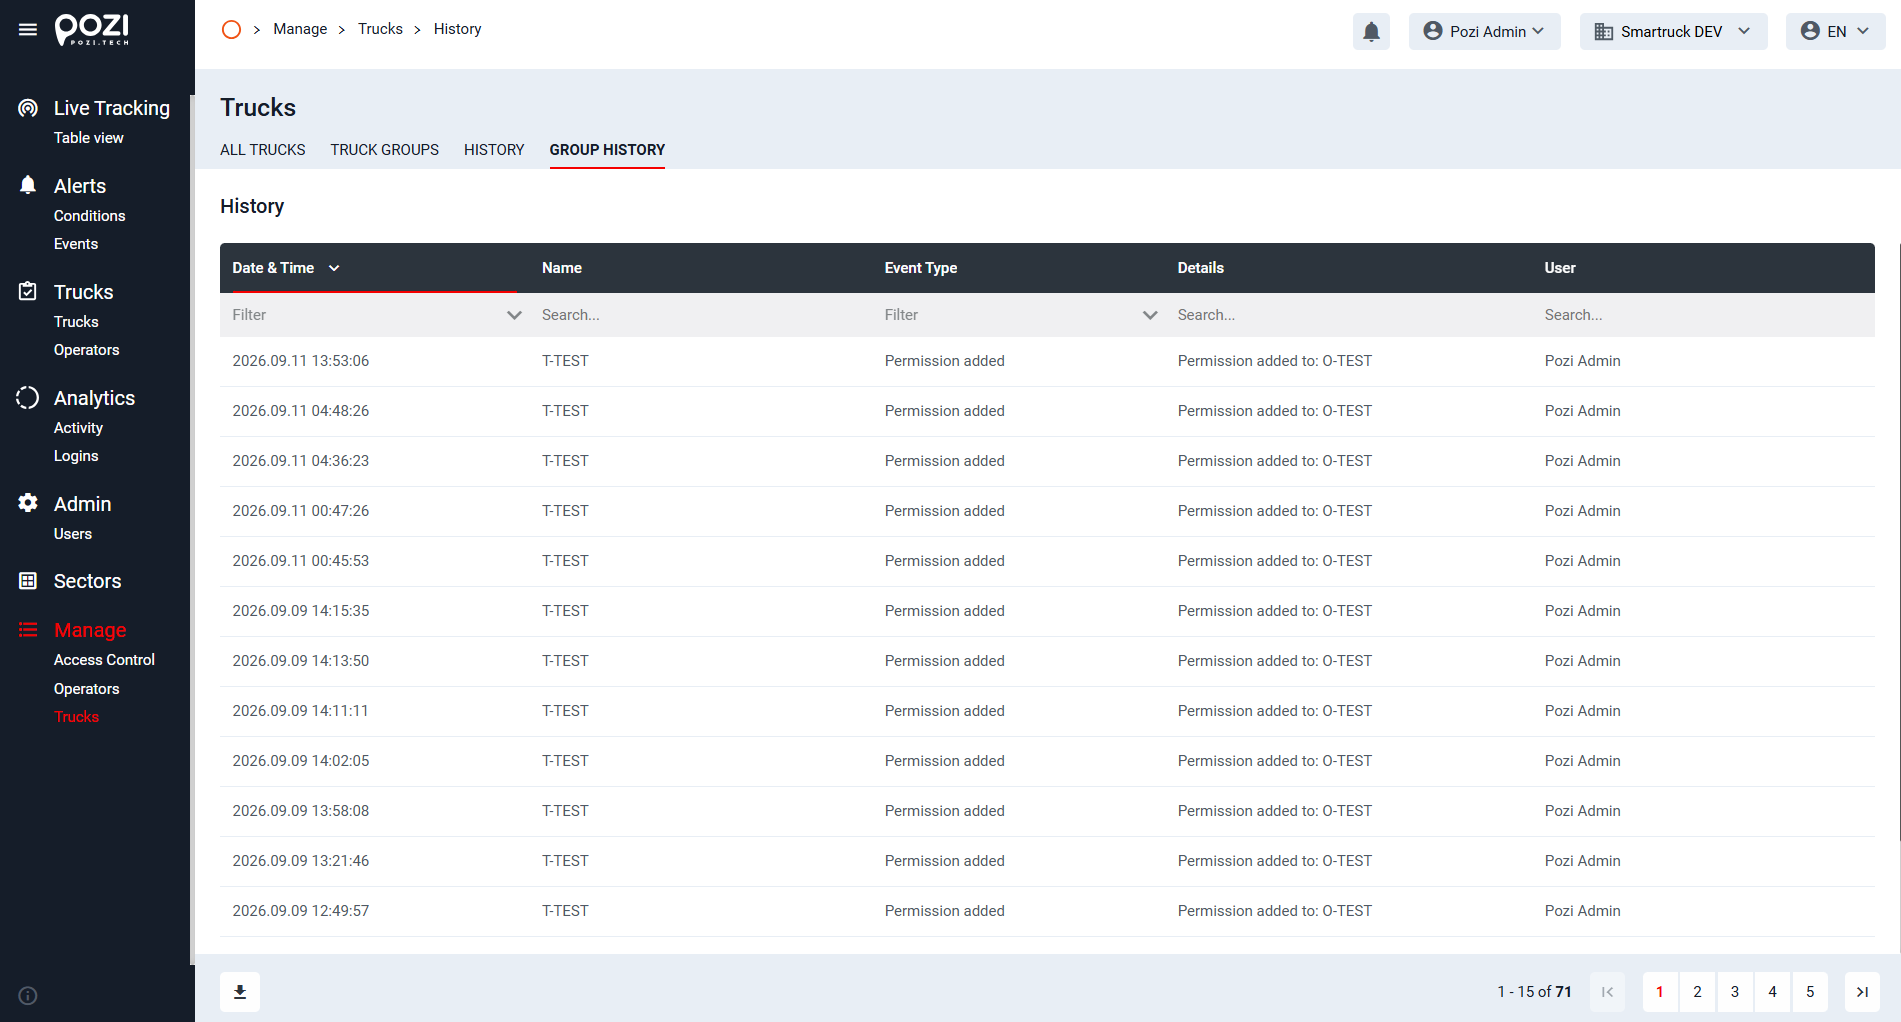
By clicking on the “history” menu item, we can open the list of editing history related to the currently examined entity type or group. In this list, each addition, deletion, edit can be found with a time stamp and the user who made the changes.
You can search for dates, names, event types, etc. – or you can filter the list according to your own preferences.
Using these steps, you can effectively manage trucks within the SmarTruck system.